Redlynne
-
Posts
1942 -
Joined
-
Hamidon attacks can hit Intangibles.
Therefore, there is no reason why Dimension Shift couldn't be coded as a Toggle which hits both Tangibles (to make them Intangible in the first place) *and* Intangibles (to keep them Intangible) on every activation tick.
Alternatively, you could accept the notion of a "leaky" Intangible toggle effect, where the duration on the Intangibility doesn't quite manage to match the activation time. Something like 1.9 seconds of Intangibility on a 2 second activation cycle time. The Intangibility then "wears off" just in time to get reapplied, and there is a 5% time window every activation cycle in which attacks can "escape" from the Dimension Shift to affect Tangible targets.
Either way gets us to a toggle Intangibility power. You can even add the GrantPowerNoIntangible that all Intangibility powers seem to have these days, so that even if you keep the toggle turned on, the Intangibility effect will only chain together for 30 seconds before suppressing itself.
S imple
E ffective
E asy
Not being done.
-
It's all a matter of the gap between expectations and results. I've been in bases where the beacons were arranged (more or less) alphabetically ... and I could NEVER remember which beacon(s) belonged to which pad. That's because in my head, I don't have an alphabetical listing of the zones laid out nice and neat for me to compare to. I think of the zones in geographical terms ... what zone is next to what. This is probably because I started playing in Issue 2, when knowing how to navigate quickly required knowing which zones connected to which other zones, and where, and how to move between them. Lots more use of Trams and the Paragon Dance Party back in those days.
I sincerely think though that without the Hero Posters it would be difficult to remember EXACTLY which telepads went to which zones. I find myself relying on the Hero Posters as a clear reminder of which telepad to go to in order to navigate around town most successfully. It's really the Hero Posters that make (or break, if you don't have them) this organization of Beacons and Telepads. -


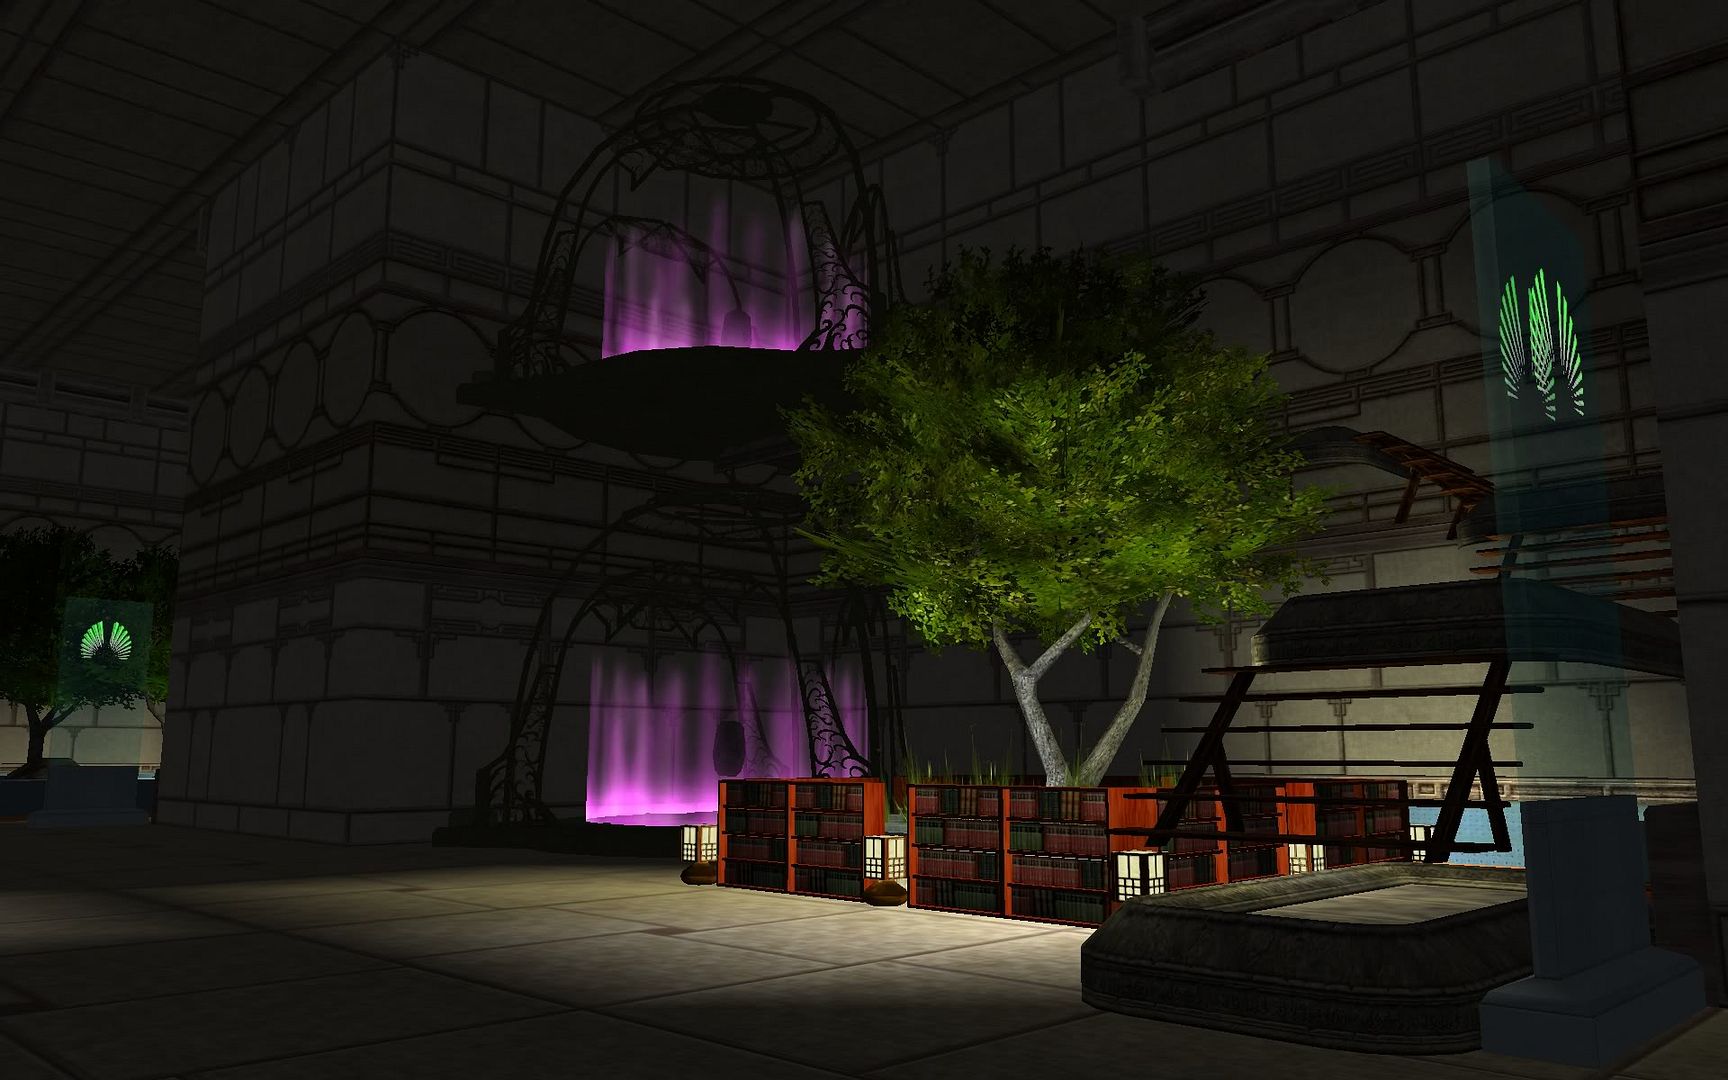
The overall "pattern" for what Transporter Rooms should look like was pretty much effectively "set" by Transporter Room 1 all those many years ago back in the pre-Issue 13 days. And if I could have kept using 2x2 rooms for Transporters, I would have ... but unfortunately, the 16x12 base plot doesn't allow room for that when there's an 8x8 room on the plot without wasting tremendous amounts of available space. So instead, in order to achieve sufficient "beacon density" with the shape of space I had available I had to make use of 3x4 Transporter Rooms (and not because I wanted to install Defensive Systems into them).
As a result, Transporter Rooms 2 and 3 became symmetrical and extended duplicate versions of what you see in Transporter Room 1. The main stylistic differences are the inclusion of the large Dual Tree Planters and the use of the 8 ft tall blonde wood Tall Bookshelves, as opposed to the shorter 4 ft tall dark wood Small Bookshelves along the walls. Because of the inclusion of the suspension bridges along the walls for the walkways to the upper pads, a steeper angle of descent was required in order to get down from that height to floor level, which in turn pushed the corner balconies at the turns higher than they were in Transporter Room 1. This in turn allowed for sufficient space to make use of the Tall Bookshelves, rather than the Small Bookshelves along the walls. This turned out to be fortuitous since it made for a better "balance" of heights towards the center where the Beacons and identifying Hero Posters were to be placed. You can also see the "standard kit" under the stairs, the pattern for which was also set by Transporter Room 1.
Of all the rooms in the base, however, Transporter Rooms 2 and 3 are perhaps the most "open and airy" in feel ... with the possible exception of the purely decorative Great Room. They're also among the least densely populated rooms in the base, in terms of object placement. The wide open central corridor leading away and vanishing into the far distance helps support this notion of being within a vast, cathedral-like space. Again, being able to control the lighting through localized lamp sources proved absolutely critical to creating this sense of incredible size and space.


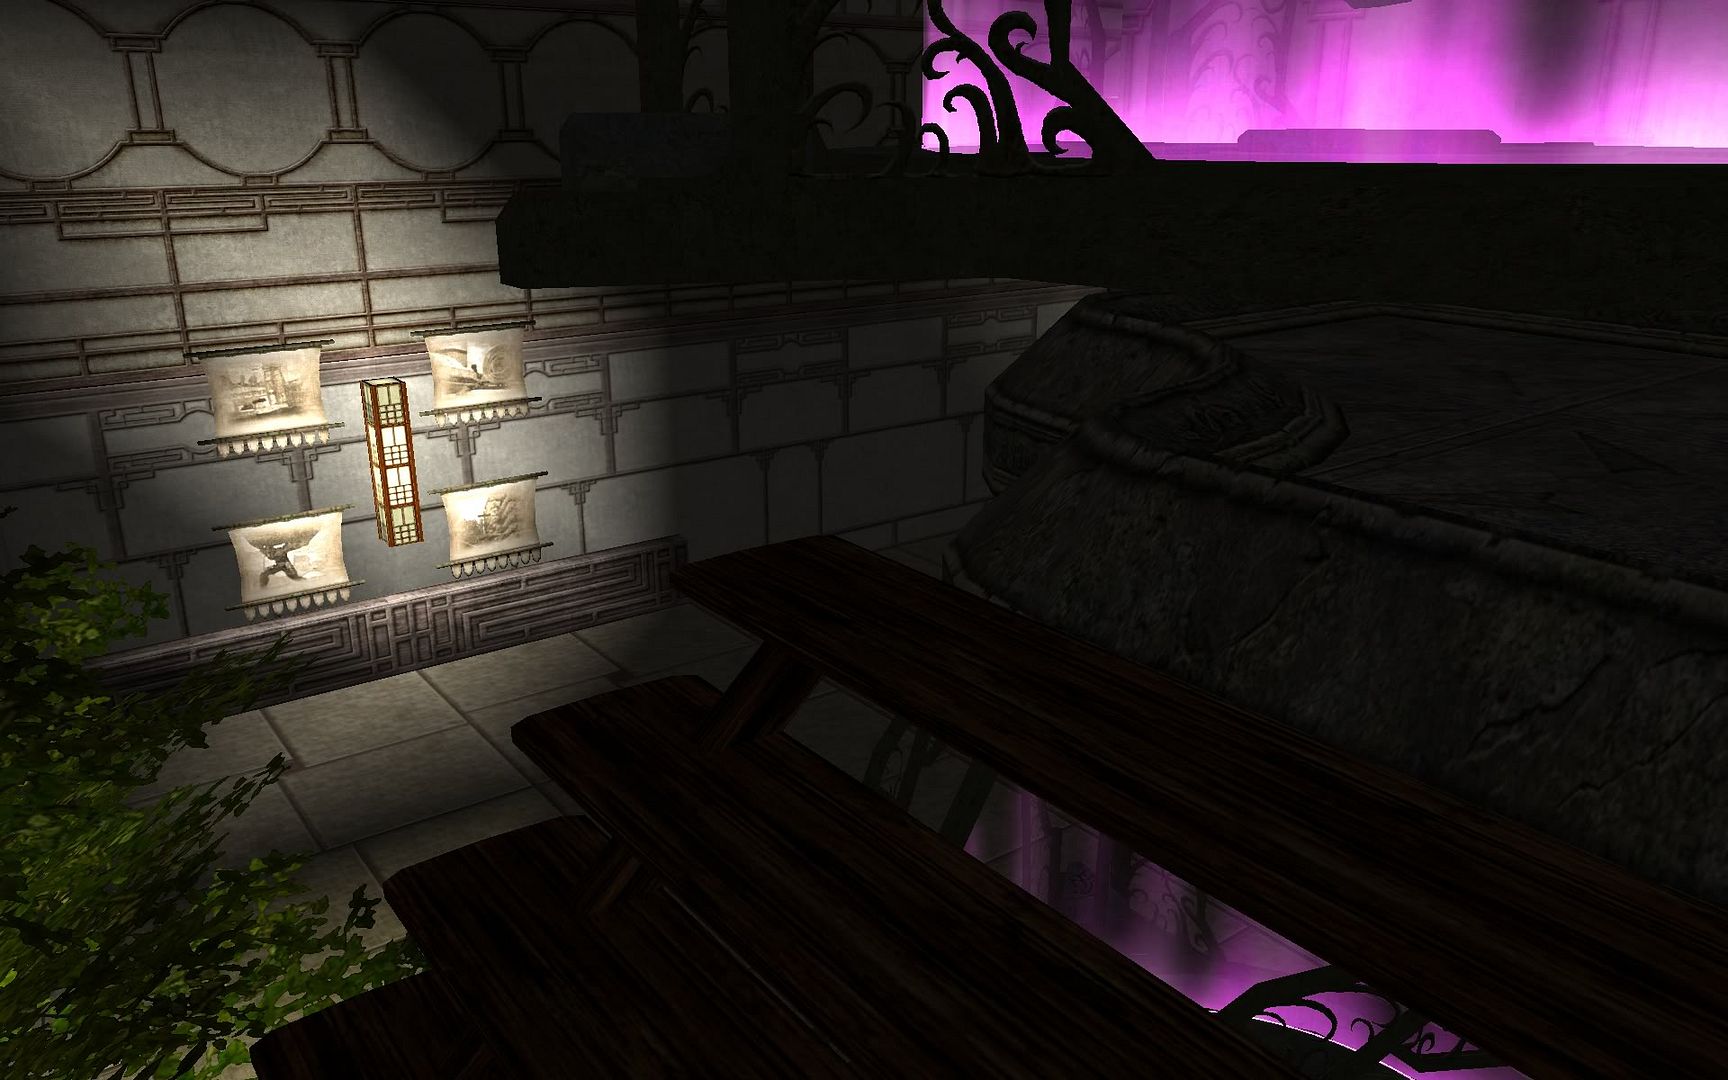
As I mentioned previously, the Beacons in the base are arranged by Geography, rather than in an Alphabetical Arrangement. There's also a hi/low split as a mnemonic aid so as to help remember which zones are assigned to which telepad, with the low level zones on the low pads and the high level zones on the upper pads. To further assist with remembering which telepads have which beacon to which zone, most of the telepads in Transporter Rooms 2 and 3 feature Hero Posters on the wall with their Beacons.
Low Zones:- Galaxy City and Perez Park (Back Alley Brawler with Manticore poster)
- Atlas Park and The Hollows (Atlas Statue with Freedom Phalanx poster)
- Founders Falls and 'Eden' (no poster)
- Peregrine Island and Rikti War Zone (Dark Watcher poster)


-
Quote:How many years do you plan to wait for a response?Originally Posted by Sidhe_Blade
 Proposal has been sent and we are waiting to hear back from the devs for the BBC
/snark -
Quote:And here I thought I was wasting my time doing this ...Originally Posted by Sidhe_Blade
about time you got some screenies up.
/em rolls eyesQuote:Originally Posted by Sidhe_Blade
Though the screenies do not give this base justice, a personal tour is the best way to see.
Tell me about it! I keep wanting to grab the mouse and move the camera when looking at them so that I can see what I know is just out of frame when looking at these screenshots. And there's so many things in a fully 3D environment like this that just can't come through in static screencaps like this simply because if you're not actually *IN* the environment you don't have a good "feel" for where everything is in relation to each other ... which can be a little disorienting. At least when you're walking through it yourself you can not only see where you're going, but can (hopefully!) remember where you've been. -

The Tech Workshop is laid out much like the Arcane Workshop, except that the space of the Tech Workshop is almost completely dominated by the Arachnos Flyer we managed to capture. We're still in the process of hacking its control systems though, which is why we've got it hoisted up on a crane.
For the Tech Workshop I wanted to not only change the wall and floor styling which predominates everywhere else in the base, but also wanted to change the quality of the lighting in this room. For that reason, almost none of the lighting types which are seen elsewhere in the base are to be found here in this room, except for rare exceptions (such as the Banker's Lamps). Even though the Room Lighting is still set to "off" here in the Tech Workshop, the change to different types of lamps and lighting sources creates a very different atmosphere within the room, creating a sharp break in styling from the rest of the base.

Right beside the entrance to the Tech Workshop, we have our two (and only two) Enhancement Tables. The near table contains Common Inventions, while the far table holds Invention Sets. Again, this helps keep things somewhat organized.

Much like in the Arcane Workshop, the Tech Workshop has a three floor design layout to it ... although in this case the ground floor is a computer lab for conducting research and exploring ideas using whiteboards. That's because if you're an Engineer, you've simply got to have Whiteboards. There's even a small server farm under the stairs. You can also see the Tech Salvage Transfer Rack here on the ground floor, just like in the Arcane Workshop.


On each side of the room, against the walls, before you get into the Flyer area proper, there is a seating area with leather couches. The idea is to give future passengers a comfortable place to wait prior to boarding the Flyer.

The work areas around the Flyer itself are rather cluttered with diagnostic equipment and spares at the moment. We've even got a fuel farm running since we're going to have to convert the fuel system to something we can supply locally, rather than needing to constantly raid Arachnos Bases for the stuff (which isn't a "problem" per se, but it is a hassle). We have however managed to get the hatches open and can easily access the interior via our Stairmaster(tm) system.


Lin Chiao Feng, our resident Mad Engineer, has given up on trying to hack the control systems of the Flyer using digital means, due to its pre-programmed defensive protocols. Instead, Lin has switched to going decidedly "old school" and set up a completely isolated, purely analog "lash up" system to probe and attack the Flyer's computers with and which should be completely immune to its much more sophisticated and high tech countermeasures. However, from the looks of things, it looks like our Mad Engineer has spent a little bit too much time "camping spawn" here in the hopes of a breakthrough.
At least with this rig though, we don't have to worry about the Flyer's computer viruses infecting the base systems.

As previously mentioned, the Tech Workshop follows the same layout pattern for salvage racks as the Arcane Workshop does. However, I didn't want to use Small Bookcases again for yet another wooden floor in the Tech Workshop. The alternative turned out to be Tech Crates, which when racked and stacked in arrays to form "floors" works quite well. Only problem is that the Tech Salvage Racks are 1ft taller than the Arcane Salvage Racks ... which causes problems in vertical spacing in a three floor design.
The solution turned out to be use of a shorter variant of the Tech Crates, but this in turn created its own problem. That's because the Short Tech Crates aren't 2 ft tall. Nor are they 1 ft tall either. Unhelpfully enough, the Short Tech Crates are actually about 1.5 ft tall (uh, why?) ... which makes them darn annoying when it comes time to use them as a "floor" and put things on top of them. Things like ... Tech Salvage Racks ... "sink into" the Short Tech Crates by a fraction of 1 ft, which while aggravating, is not the end of the world. Fortunately, this is one of those things which is easy to overlook if you don't already know it's there.

The second floor also sports a lab bench underneath the stairs for conducting chemical experiments and using microscopes. There's even a CC TV monitor here for analysis of microscope slides.

This view shows you exactly how the Tech Salvage Racks mimic (as best they can) the layout choices made in the Arcane Workshop. Again, makes things so much easier to find, so long as you know what tier of salvage you need to be looking for. Also, notice the lights embedded into the Tech Salvage Racks. The Tech 2 Lamp blends in so well that on more than one occasion I've had to point it out to visitors touring the base, even though they're right there in plain sight.

Here is where the hangar door and crane for the Captured Flyer are controlled from. Any operator has a far better view from up here than they would down on the ground floor.

Also, up here on the third floor, just as in the Arcane Workshop, is where the Tier 3 Empowerment Station can be found. Again, it's both "out of the way" while also near to the source of salvage needed to fuel the Temp Powers it creates.

-

The Arcane Workshop, by virtue of its abundance of space, became the first triple purpose room (as far as decorating was concerned). The main function of the room is as the nexus point for Inventing, and correspondingly, the Invention Table and Vault are both placed in a position of maximum convenience with regards to work flows and easy access. As a matter of fact, I've found putting the Invention Table and Vault adjacent to each other like this to be so convenient that I've made it a standard feature in any base I'm working on editing. It just makes usability so much simpler, I find.


Immediately "behind" the Invention Table and Vault is the triple level workshop, which I have previously posted on in this forum. The lowest level is simply a "library" styled area in which to conduct research or relax. The height of the ceiling down here in this lowest level is only 8 ft high, which can have the tallest characters in the game brushing their hair against the "ceiling" when walking around down under here.
You can kinda sorta tell where I embedded lighting within objects by seeing the light blooms on the "ceiling" above. In this case I put Shouji Wall Lamps into the big curvy Ottomans and also into the Globe in the center of the round table. This Lamp in Globe would then inspire me to repeat the combination elsewhere in the room in the Cantina area.
On the ground floor here, you can also see a single solitary Arcane Salvage Rack. This particular salvage rack is actually the Arcane Salvage Transfer Rack and is used to handle overflows from the racks on the upper floors as well as to facilitate transfers between SG Members (especially alts!) and as such is intended to be kept empty most of the time.


On the far side of the room, at ground level, is the Cantina ... complete with kitchen area and an overhanging mezzanine of balconies. This is where the SG gathers for meals and socializing. There's even a bar with barstools around the kitchen.


On the Mezzanine level, I tried using the Pointilist Paintings again as a substitute for (stained glass) windows, although I don't think the effect works quite so well at such close range. However, looking outwards from the balcony roundtables, you get a rather nice Treehouse Effect(tm) which makes the view rather refreshing.


A couple of things to note from this vantage point here on the steps up to the Mezzanine. For the four Medium Trees that you see, I embedded a Shouji Floor Lamp directly under the tree trunk. This is what gives each of them their highly distinctive lighting effect without betraying the origin of the lighting itself. You can also see what the Shouji Wall Lamp embedded in Globes inside Round Tables looks like a bit more clearly from this angle than you could in the "library" area earlier.

Back over by the door now, with the Invention Table and Vault behind us again, you can see the stairs which lead up to the second and third floors where the primary Arcane Salvage Racks are located. The second floor racks hold Common Salvage, while the third floor racks hold Uncommon and Rare Salvage. There are three racks on each floor so as to keep salvage somewhat self-sorted, as you can see by the banners located beside each rack.
1 = Levels 10-25
2 = Levels 30-40
3 = Levels 45-50
This way, all you need to know is the Level of the IO Recipie you're making and from that you'll know exactly which salvage racks to go to in order to find if the SG has that kind of salvage on hand. Saves a LOT of time searching through racks where everything is just all thrown together, since this system does a very good job of self-sorting. You just need to "know" which types and tiers all of the bits of salvage are in order to store them correctly in the first place.
Since this is the Arcane Workshop, only Arcane Salvage is stored in this room. There is a counterpart construction in the Tech Workshop for Tech Salvage which follows the same arrangement to make things easy to remember.


Up here on the third floor, I found perhaps the most dramatic demonstration of the visual trickery involved with the Flaming Crystal Ball Torches which I'd discovered in the Power Room. You can also see from up here the Invention Table and Vault down below on the ground floor, as well as the Tier 3 Empowerment Station up here on the third floor. I like having the Empowerment Station up here where it's both "out of the way" but also closely adjacent to the salvage racks containing the salvage needed to fuel the Empowerment Station to acquire Temporary Powers.


I'm also rather proud of this "curly bridge" construction I was able to fit in here at the end of the third floor. It gives you a nice view of the adjacent Infirmary Room and leads into a "night light" lit quiet reading area which is actually rather private.


Beyond the "night lit" library area and across the bridge, there are the crash space dorm rooms for SG members to catch some sack time. Each room features meaningful soundproofing (in the form of plenty of books on bookshelves) and comes with its own hide-a-bed couch. There's even a lamp provided for those who like to read in bed, although these are usually kept turned off as a courtesy to anyone else who might be sleeping in an adjacent room.


Along the far back wall, there is a "secret" passage between two of the rooms ... which leads out onto a balcony overlooking the Arcane Workshop area.


All the way back around along the wall, the Dorm Rooms continue over to another bridge which leads back to the stairs that come up to the third floor. Standing on the bridge, you have a very good view into the next room ... the Tech Workshop.


-
Gh0stbusters.
With theme music. -

The Power Room, with its secondary function as a Hangar and Launch Bay for a group of Longbow Chasers, incorporates its own share of discoveries. One of the first of which was that the SG Floor Plates, like the Arcane Floor Seals, has no underside skin texture ... making them fully transparent from below. This then allows for better viewing of the "ready to launch" Longbow Chasers on their flightlines up above when standing at ground level.


The next three innovations involved the placement of the Arcane Power Crystal, the construction of the floor torches and the construction of the cargo and hangar bay doors you see on the walls.
As you can see, the Arcane Power Crystal "hangs" from a massive Ceiling Dome which is itself ringed with Ceiling Spikes. The very tips of the Power Crystal manage to clip less than 1 ft into to Ceiling Dome, giving the Power Crystal an appearance of being suspended. Unfortunately, the underside of the Power Crystal which touches the floor is yet another item with no underside skin texture to it. So in order to minimize the "obviousness" of this art error, I had to use trees strategically placed to once again conceal and obscure the 3D trickery that I was getting up at this point.
The flaming torches you see here are really 3 superimposed items ... a Floor Torch, a Desk Crystal Ball (floated) and a Wastebasket ... and are exceptionally easy to make, once you've mastered techniques for floating objects. Curiously, the Crystal Balls have visual properties which result in some refractive distortion of objects seen through the Crystal Balls, while at the same time "negating" the rendering of any particle effects within the bounds of the Crystal Ball. And since open flames are a particle effect, it appears that the Crystal Balls at the tops of these Floor Torches are wreathed by, but not engulfed within, open flames. It's as if the glass of the balls themselves was on fire, but only on the outside. The wastebasket on the floor is there to catch any falling cinders and because the bottom of the Floor Torch is somewhat lackluster and boring.
On the back wall you can see the (almost) ground level cargo door access to the base. Just back up an 18-wheeler on the other side and roll up the loading dock access door. The "door" itself is simply made up of Wall Vents, and Large Shouji Wall Lamps are used to create the appearance of a "boundary" around the "door" in the wall. Up above, the same principles are used on the flight lines at either end of the room on both sides.
You can also see (admittedly, not well) the spiral staircases in the back of the room which lead up to the middle level where Launch Control is situated. Due to the layout of the rest of the room, I had to use a spiral staircase construction, simply for lack of anywhere else for the stairs to go.


Launch Control for the Longbow Chasers is located on the mid level where an operator can have a minimally obstructed view of the flight lines on both sides. It is also placed low enough so as to take advantage of the invisible undersides of the SG Floor Plates. As can be seen here, even a minimal adjustment in height at the right level makes the upper sides of the SG Floor Plates visible ... and they are (of course) structural elements which can be walked on. You can even see one of the levers used to open the hangar doors through which the Longbow Chasers are launched. There's even fire prevention and suppression equipment readily at hand on the upper flight lines.
It was also up here, along the walls beside the flightlines, that I first toyed with using Pointilist Paintings as "windows" to the outside. You can see the results here, where due to the "cutoff" of the floor level of the flightlines, the paintings when placed in close together series like this create a partially successful illusion of being stained glass windows looking outside.
Also note that the stairs up to the flight lines offer yet another good vantage point for seeing the Arcane Power Crystal (improbably) suspended underneath the massive Ceiling Dome.


Each of the two flight lines has four Longbow Chasers parked on the flightline tramway, which makes for a rapid Team-8 launch when the Supergroup needs to deploy. There are doors at either end of the flightlines, and the doors behind the last aircraft lead to the elevator that goes to the base hangar where the Longbow Chasers are stored for maintenance.
A bit of lighting trickery up here involves imbedding Shouji Wall Lamps inside the Longbow Chasers. This has the effect of lighting up their surroundings, while keeping the exterior surfaces of the Longbow Chasers themselves relatively dark. This heightened contrast of light and dark helps bring out the metallic sheen of their appearance, making them look more impressive.


-

The Infirmary in the Spring Knights has a somewhat unique atmosphere to it since there are some elements to the design which break the trends seen and followed in other rooms. The biggest factor is that the primary lighting source in this room doesn't come from lamps like in other rooms. Instead, it comes from a Bonfire ... which gives the room its relatively unique warm firey glow. There's also the Rez Rings, situated on top of "The Planet" which are the only location in the entire base to which it is impossible to Walk to.
Underneath "The Planet" is the base Inspiration Storage, which was lifted 1 ft off the ground into the position you see here. This adds a smoke effect around the animated rainbow rings of the Inspiration Storage, thanks to the Bonfire underneath. Ironically, the fire animation of the Bonfire is almost totally concealed, with only the occasional lick of flame rising high enough to actually be seen. We have just the one Inspiration Storage bin, and we pretty much only put Tier 3 Inspirations and Essence of the Earth into it, with overflow Tier 3 Inspirations getting sold on the open market.
The Tree of Wonders can also be seen here, incorporated into yet another Medium Tree. A happy coincidence is that the rocking animation of the Tree of Wonders is almost (but not quite!) perfectly synchronized with the swaying animation of the "leaves" on trees. This means that by floating the Tree of Wonders and rotating it into position, it is possible to make this item appear to be part of a green leafy tree (as you see here). Ironically, the most common use for the Tree of Wonders is as an NPC vendor to whom unwanted Inspirations (usually Tiers 1 and 2) can be sold, along with unwanted Invention (Set) Recipies for same (best) price as you'd get from Freedom Corps, which can save unwanted trips around town.


On top of "The Planet" you can see the Rez Rings. However when building "The Planet" using two small domes (floor and ceiling) I noticed that a fall from the height of the Rez Rings to the floor would cause a Hero without a Leaping power a token amount of damage. This led to the creation of a "Ring" around "The Planet" which is placed at a height from which there is no falling damage, regardless of powers taken. The "Ring" itself is actually an Arcane Floor Seal of the same type as the one used in the Entry Room under the Entry Portal, this time wedged into the dividing line between upper and lower Domes which form "The Planet" you see here. However, the Arcane Floor Seal, like a number of other available objects, has no underside skin texture to it ... presumably because when it was being made the Dev(s) responsible never imagined that items like this could be floated up into the air (and stay there). This means that the "Ring" around "The Planet" is only visible from a very limited number of angles from below, and that due to the small 2x2 size of the room and the placement and height of items, the "Ring" is hardly ever seen when standing on the floor under "The Planet" above. The "Ring" is of course plainly visible from above, as you can see.


This is the view that greets you upon actually using the Arcane Rez Rings. On the wall opposite you can see the first glimpse of my use of the Pointilist Painting as, what amounts to, stained glass windows. This also gives you a sense of scale (up here) which may not be quite so apparent in the other screenshots.

-
You need to be able to swim lower than 3ft before you can make use of water based attacks.
-

Transporter Room 1 became a major factor in defining the aesthetic of the Spring Knights base. It's also the reason why an Arcane theme predominates everywhere except in the Tech Workshop. It also happens to be one of the few rooms in the base least affected by the Raid Pathing changes, as you can see by comparing it to the original room shown in the City Scoop Base Showcase from yesteryear ... in which I REALLY had to kludge things together in order to make a stairway to the upper teleporter pad ...
Thankfully, Raid Pathing has been turned off and consequently I was able to exploit that to great advantage. The room layout has hardly changed at all, except for having changed position in the overall layout of rooms on the base plot, which in turn brought about a rotation/repositioning of elements in the room.


As you can see, without the restrictions of Raid Pathing, and being able to place objects inside of other objects, I was able to dramatically improve the lighting situation by imbedding my shouji floor lamps into the Medium Tree planter and complete their concealment using Small Bookshelves. I could also place a floor lamp into the back corner behind the Corner Couch without having to put it into a position where the floor trim would be eliminated. This resulted in an overall "smoother" look to the area. Also the "leftover" space under the stairs here pretty much defined the arrangement of firehose, extinguisher, wall phone, recycling bin and shelving cart which became somewhat standardized throughout the entire base. The pattern for this sort of thing was essentially set right here.
It was also because of this room that I decided to put "wood paneling" into many of the rooms. This often took the form of yet more Small Bookcases.

The stairs and balconies leading up to the upper pad are now all wood, thanks to the removal of Raid Pathing restrictions. I've noticed that on more than one tour, visitors were somewhat surprised to "find" this path to the upper pad. The layout of the stairs and balconies here also set the pattern for what was done later in the larger Teleporter Rooms 2 and 3, which added bridges into the mix simply because there was space for them in those rooms.
The Transporter Pads themselves are Arcane simply because the Tech variety are "too tall" cannot be stacked on top of each other like this. They are also the reason why the entire base became a Lights Out construction. This is because it is only in the darkness that you can see the beautiful purple glow that the Arcane Transporters have, which I wanted to emphasize. With room lighting ON that beautiful glow just gets completely overwhelmed and washed out. The same thing can happen if you place your Lighting lamps too close to the Pads, so it was very important to be able to control the lighting blooms from the lamps I was placing elsewhere in the room.


The Spring Knights base uses geography, rather than alphabetizing, to organize its Transporter Beacons. We also use a helpful mnemonic of high/low to assist with remembering which pads go to which zones. Teleporter Room 1 here is the "main hub" room for getting around to city services, such as vendor NPCs, PTA Trams, Pocket D, and Wentworth's auction houses.
Low Zones:- King's Row and Striga Island
- Talos Island and Dark Astoria
The "light bar" you see in between the Beacons here was actually a discovery/innovation. Only the top and bottom shouji wall lamps are "on" while the middle two are "off" here (and I know they don't look like they're off, but they are actually "off"). If they were all turned on, the resulting light bloom would be "too much" and would wash out the Beacons entirely. This is merely yet one more example of using lighting control to your advantage as a Base Designer.


-

The Entry Room is somewhat unique in that the Entry Portal is not placed on the floor. Instead, it has been positioned on top of an Arcane Floor Seal which is accessed by stairs and wall balconies which run along the perimeter of the walls of the room. I was told once that the result looked somewhat like a Stargate tipped over on its side.


By raising up the Entry Portal, a great deal of additional usable floor space was created underneath, which in turn became a somewhat typical lobby/reception area. You can see here that one of the major design elements is already taking hold ... that of using trees as a means to obscure from immediate view some of the necessary kludges which make 3D work at least passably coherent. This also helps focus attention inwards into the room and away from the walls, helping to add to the sense of vast open spaces. Also, do you "get" the joke with the bathrooms?


This arrangement of safety equipment, waste disposal and library distribution you see here under the stairs became a defacto standard for every room in the base. It's one of those things which is easy to overlook, but which you are subconsciously aware of.

-
Seeing as how the Spring Knights base has undergone some pretty major revisions since it appeared in the City Scoop a few years back (when Raid Pathing was still a major limitation, and floating objects was absurdly onerous), I figured the time had come for a little bit of an update. Plus there's the fact that every so often the subject of "turn off the lighting" will crop up in conversation around here, and I'd like to think that this is in no small part due to the example I've managed to set with the design of this base. So I guess it would behoove me to do some Pictures=1000 Words sorts of sharing with the other base builders in this forum, since this is the sort of thing you have to SEE in order to understand the full ramifications of.
Spring Knights is a Hero SG on Virtue that boasts a membership of only 3 players, of which I am one. The SG roster is filled with our alts, and numbers under 30.
The base plot is a 16x12, and as you can see in the overview the amount of unusable space has been kept to a minimum.
The base plot contains the following rooms:- Entry (2x2)
- Transporter Room 1 (2x2)
- Infirmary (2x2)
- Power Room with Hangar/Launch Bay (3x3)
- Arcane Workshop with Cantina and Dormitory Crash Space (3x4)
- Tech Workshop with Captured Flyer (3x4)
- Transporter Room 2 (3x4)
- Transporter Room 3 (3x4)
- Control Room (3x3)
- Decorative Great Room (8x8)
There were four major aesthetic choices made early on which helped to shape what you'll be seeing here. One was to "turn the lights off" in the lighting controls and only use locally sourced lighting from lamps and similar items. This allowed for very careful fine tuning of lighting within the base, which in turn allowed for a very important sense of ambiance to emerge. The result is a sort of feeling of the base existing in a sort of twilight shortly after sundown, with the lamps producing "islands of warmth and comfort" in the darkness.
The second major aesthetic choice was to retain, wherever possible, both the ceiling and floor trim. It seems to be the fashion with a lot of base designers to deliberately remove the trims from their ceiling and floors, and I wanted to go against that trend. Fortunately I was able to successfully adhere to this "rule" in every place except one ... and for that one exception is makes sense that it is an exception.
The third major aesthetic choice was to have every room in the base set to have floor height set to lowest and ceiling height set to highest. The result is an almost cathedral-like sense of vast spaces, which I was at pains to NOT fill completely. Instead, I wanted a design aesthetic which skewed towards the "open and airy" sensibility, since that would heighten the feeling of "vastness" you would get simply walking around within the base. So it was rather amusing to me when I was showing City Scoop Editor EnnVee around for the original article, when the base was only 6 rooms on an 8x8 plot, and have EnnVee ask me ... "just how BIG is this place anyway?" It was almost as if EnnVee had never seen 2x2 rooms before that didn't feel small and cramped.
The fourth major aesthetic choice was to have trees in almost every single room. The trees themselves offer a useful screening function for being able to obscure some of the more obvious trickery that has to be involved whenever building your base in 3D. They also serve a very important purpose of drawing your visual focus away from the walls and into the room, which makes everything "feel" larger and more open than it actually might be.
Anyway, enough rambling.
In this screenshot tour, you will occasionally see my Peacebringer, Autumn Turning. I only did this when a first person view simply couldn't give me the best camera angle, or when it was important to have a sense of scale in a screenshot. Autumn Turning stands approximately 5' 7" in the physique editor, which should give an adequate point of reference. -
Here's a frankenslot I found that works wonders for Frost:
Quote:Gives you 15.2 ft of Cone Range. Why would you want that? Because that lets you jump straight up (without combat jumping even!) and reorient your 90 degree cone attack down towards the ground ... where it can hit everyone around where you were standing, not just the idiots in your forward arc.Level 4: Frost - (A) Detonation - Accuracy/Damage/Endurance: Level 50
- (5) Detonation - Damage/Endurance/Range: Level 50
- (7) Positron's Blast - Damage/Range: Level 50
- (7) Positron's Blast - Accuracy/Damage/Endurance: Level 50
- (13) Mocking Beratement - Taunt/Recharge/Range: Level 50
- (15) Perfect Zinger - Taunt/Recharge/Range: Level 50
(Frost)- MezResist(Sleep) 1.65%
(Frost)- 2.5% (0.04 End/sec) Recovery
I've found the Hop-Frost tactic to be excessively useful and extremely simple to execute, because it turns a forward cone attack into essentially a PBAoE-ish attack which can cover a really decent radius around where you (were) standing, simply by jumping straight up and hitting Frost at the top of your jump, thereby maximizing cone area coverage on the ground. And since the move is purely an up/down temporary repositioning, you don't have to worry about hostiles chasing you down (while slowed) like you would if you were constantly retreating laterally so as to get everyone into your forward arc. -
- Stun, Sleep, Confused, Terrorized, Immobilize, Held +65.56% for 15s
Effect does not stack from same caster
Ice Arrow (Hold)
Poison Gas Arrow (Sleep)
EMP Arrow (Hold)- RunSpeed, FlySpeed, Heal, ToHit, Endurance +65.56% for 15s
Effect does not stack from same caster
- DEF(All Types, Defense, Melee, Ranged, AOE) +65.56% for 15s
Effect does not stack from same caster
- Stun, Sleep, Confused, Terrorized, Immobilize, Held +65.56% for 15s
-
I've got a Grav/TA and let me tell you, it is a totally clicky combo to play. You have NO TOGGLES in your primary/secondary. Life is "kinda rough" until you reach 33, when you can put some slots into Singy, but after that it starts getting easier.
Unlike Grav/Kin, you do have a bit better Range To Target synergy with Grav/TA since the combo is very happy with never getting close to any opponents for any reason ... unlike /Kin or /Storm where there are multiple advantages to staying in close. This means that you can "hide out" inside of Singy (who will Repel everything that gets close to you) with impunity since you're not using your own positioning as a component of your attack strategies.
If you go Grav/TA, make sure to choose either Magic or Tech as your origin so that you can use your origin power to light your Oil Slicks. Grav/* does not inherently have any fire or energy based attacks to light your Slicks with. If you pick something else as your origin, you'll be waiting for an APP power pick to find a way to reliably ignite your Slicks.
The hardest thing to live with when playing Grav/* is that most of its damage output is DoTs. That means lots of little numbers smoking off everywhere rapidly, rather than seeing BIG numbers cropping up as a direct result of smacking something. Only Propel is a heavy hitter attack, but it's short ranged and the animation and projectile flight time on it is so long that the power is nigh unusable in teams (target dead LONG before projectile arrives to do damage). Because of this, Grav/* doesn't "feel like" it has a whole lot of "oomph" factor to it, and you can waste attacks (and endurance) on targets that were already going to die anyway from all the DoTs stacked on them already ... but which hadn't died yet ... which can be frustrating.
Grav/Storm is definitely chaotic to play ... but Grav/TA also has its strong points which don't involve pure chaos and are more about "ruining somebody's day" through debuffery and control. The resistance debuffs in */TA also help out with the "weak" damage feel of Grav/* and can in many cases accelerate a team's bulldozer pace better than other secondaries (or some primaries) can.
And Oil Slicks can be used on Hamidon Raids ... -
Quote:High Pain ToleranceOriginally Posted by Aett_Thorn
Correct me if I'm wrong, but the +Healing bonuses shouldn't affect HPT for two reasons:
1) It's a passive +HP power, not an active Healing power. The +Heal bonuses only work on powers that give you a green number over your head.
2) HPT provides resistance, and the +Healing bonuses don't work on powers that also offer a resistance element to them. Case in point: Healing Flames.- Max HitPoints +187.407 for 10.25s [Ignores Enhancements & Buffs]
Effect does not stack from same caster - Max HitPoints +187.407 for 10.25s
Effect does not stack from same caster - RES(All Types) +7.5% for 10.25s
Effect does not stack from same caster
Note that the +Max HP in High Pain Tolerance is actually composed of two components ... one of which is not enhanceable ... and one of which is enhanceable. The enhanceable portion of +Max HP is increased by Heal Enhancements, and gobal +Heal from set bonuses counts towards this. - Max HitPoints +187.407 for 10.25s [Ignores Enhancements & Buffs]
-
High Pain Tolerance - Numina: Heal/End, Heal/Rech, Heal/End/Rech, Heal
Fast Healing - Numina: Heal/End, Heal/Rech, Heal/End/Rech, Heal ... Regenerative Tissue: +Regen Proc
Health - Numina: Heal/End, Heal/End/Rech, Heal, +Regen/+Recovery Proc
Rise to the Challenge - Numina: Heal/End, Heal/Rech, Heal/End/Rech, Heal ... 2 common 50 Taunt IO
Physical Perfection - Numina: Heal/End, Heal/Rech, Heal/End/Rech, Heal
That right there gives you five 4-slot Numina Sets, which in turn synergizes impressively and gives you (combined):
+60% Regeneration (not counting the Procs!)
+9.4% Health
+30% Healing (which supercharges High Pain Tolerance for even MORE of a HP boost!)
This combo will pretty easily get you within striking distance of the HP cap. Get some more +HP mods (not hard to do) in your attacks and you'll be there.
You can get even more Regeneration (if you want to) by 2-slotting Triage sets along with all the 4-slot Numina's, which will add another +4% Regeneration each. You can also 2-slot Pounding Slugfest (melee set) into your attacks for +8% Regeneration each. -
Wait a couple weeks and go Kinetic Melee/Super Reflexes.
You can thank me later. -
Quote:I've played Ninja/TA up to 39, and it's getting harder and harder to keep my Ninjas alive if they aggro more than 2 or 3 hostiles at a time. They really are quite suicidal faceless minions.Originally Posted by Berzerker_NA
Wow. I didn't know there weren't any. I think I'll set one up pretty soon then. My favorite MM ever is probably my Ninjas/FF.
Kinetic Crash is loaded with things which are really nice for a Mastermind ... including Knockback Protection. Also, being able to pre-emptively "punt" just about any hostile into a corner of terrain where you can keep them pinned by use of Force Bubble and/or Repulsion Field isn't that bad either (assuming you have either of those powers in your build).Quote:Originally Posted by Berzerker_NA
Force bolt is a magnitude 8 knockback. It really doesn't need boosting
I do that quite a bit with my Controllers, so as to stack anti-Boss Mag levels that much more often. Problem is, neither Ninja/* nor */Force Field really has all that much to stack it with. As a MAG 2 Hold, the Devastation Proc's usefulness is limited unless teaming with others.Quote:Originally Posted by Berzerker_NA
I like putting the Devastation: Chance to hold proc on it just for overkill.
Never expected it to. If it did for your pets then it would for everyone (and thus everyone would be using it as a "build up" type power on teams). But since it doesn't, it ... doesn't ... and that's fine.Quote:Originally Posted by Berzerker_NA
Grant Invisibility does not allow your ninjas to do critical attacks.
Sneaking up on people is less important than getting to the DEFense softcap methinks. And although half of Grant Invis' DEFense is dispelled by attacking, half of it still remains in effect even while attacking. So Grant Invis' is a pretty decent way to reach for the softcap if you're not quite there yet.Quote:Originally Posted by Berzerker_NA
But Grant Invisibility would add to their stealth so they could sneak up on people more easily.
I've heard this from multiple sources, but to be honest I haven't found it to be true in my own experience ... and I'm playing Ninja/TA without Aid Other. With decent set slotting getting both endurance reduction and recharge over 55% and with a couple slots of endurance reduction in Train Ninja and Kuji-in Zen, it's a fairly simple thing to treat your ninjas as the disposable faceless minions they really are. Just keybind a dismiss pet(group) to dispose of survivors and simply resummon fresh idiots. The cost to buff them is the same as if you're summoning one or all of them, so there's little reason NOT to dismiss and resummon when you've lost a few to combat.Quote:Originally Posted by Berzerker_NA
Medicine: The set is basically unplayable without Aid Other to refill your ninjas' health. It usually heals over half their health bar.
And Aid Other isn't going to save your bacon if your braindead pets INSIST on standing in lava.
Which makes me wonder if Stealth is incompatible with Ninja Run+Hurdle.Quote:Originally Posted by Berzerker_NA
Fitness: Jumping is the only kind of travel that isn't slowed when using Stealth. So I like to take hurdle.
I've found the best slotting for Smoke Bomb is two Endurance Reduction and two Recharge Reduction. Lets you start using Smoke Bomb proactively as a Build Up power on your henchmen.Quote:Originally Posted by Berzerker_NA
Smoke Bomb is really good. You can totally save a ninja who's about to die.
Huh?Quote:Originally Posted by Berzerker_NA
If you're doing concealment, go ahead and take Ethereal Shift. It's rad. Your henchmen go ethereal with you, and continue to draw whatever aggro they had provoked prior to using it.
Are you talking about Phase Shift, the Tier 4 in Concealment? Or are you talking about Ethereal Shift, the Temp Power you craft with salvage and a recipie? And how can it take your henchmen ethereal/phased with you? Isn't it a self-only power?
I was going to say the same thing about the Genin. With Genin defenses softcapped, they become MA/SR/Weapon Mastery scrappers. I know from experience playing a softcapped MA/SR scrapper just what is possible, with and without Aid Self.Quote:Originally Posted by Berzerker_NA
Try to get your Jounins' defense up to the 45% soft cap if you can.
Ah. I was wondering if Mace Mastery or Soul Mastery was going to be the better choice. Of the two, I'm thinking that Soul Mastery would fit a tad bit better with my playstyle and slotting choices.Quote:Originally Posted by Berzerker_NA
Mace Mastery is the best Epic Pool because the Web Envelope Immobilize include fly protection (your Jounin can't stab fliers very well with their swords.) And Power Boost will add about 6% or so to the defense provided by your bubbles, helping you get your ninjas up to soft capped defense easier. -
Slot ol' Quantum Flight with two common 50 Endurance Reduction IOs and call it a day. As mentioned, even unenhanced for +fly Quantum Flight will push you beyond the flight speed cap, so the only other useful thing to slot into it is End Rdx.
-
There is a new powerset called Kinetic Melee.
It has 9 powers in it.
Secondary Effects are KB/KD and Stun.
Kinetic Melee hits do Damage Debuff to enemies which then Damage Buff you.
The Build Up power for the set magnifies this Debuff/Buff effect for a short duration.
There is no other useful information concerning this powerset at this time.
Enjoy 3 screenshots that tell you the default color for this powerset is yellow. -
I'm on Virtue as well. I'll send you an in-game /tell and we can see about giving you a tour of my base which has often resulted in inspiration for other people.
-
I'm mildly surprised to see that there aren't any Ninja/Force Field guides for Masterminds available. Worse, there aren't any */Force Field guides for Masterminds available. So I'm going to have to throw this out to the community.
I'm not looking for a Build ... I've already built one up within Mids' which looks like it will work out just fine. I've already got a Ninja/TA, so I've got a fair idea of what I'll be in for doing a Ninja/FF MM.
What I *am* looking for are the "tricks of the trade" that other players have discovered prior which made Ninja/FF work very effectively for them as Masterminds. Things that might not be instantly or immediately obvious at first blush. Stuff like ...
6-slotting Force Bolt with Kinetic Crash instead of a Ranged Damage set
Avoiding use of Personal Force Field, since it will put you into OnlyAffectSelf mode and cut off your Pets from Supremacy.
Adding Maneuvers and Grant Invisibility, both slotted, along with the Edict of the Master +DEF IO to softcap even the Genin, turning them all into */SR Pet Scrappers with NO GET HITSU. Then stack Tactics, Assault and Stealth, plus the Stealth IO in Sprint into the build along with those choices for some real NinjaNinjaNinja action.
Resisting the urge to Tankermind, since Bodyguard Mode is going to be one of the few ways to bypass Pet Defenses.
How useful (really...) is Global Recharge reduction to a Ninja/FF where so many of your powers are either long duration buffs or toggles? There really aren't that many click powers in Ninja/FF.
Is Force Bubble just so good that Repulsion Field is a wasted power pick (at Exemplar Levels 33+)? Or do these two powers complement each other and have different tactical uses that need to be appreciated?
Is Detention Field really all that useful? If so ... in what situations?
What powers beg to be Frankenslotted ... and why? To what advantage?
I presume that bubbling a team-8, plus 6 pets of my own, will pretty much require having Stamina. What would have to be sacrificed to make a Stamina-less build viable? I'm thinking the Concealment and Leadership Pools would fall into the "no go" category if Stamina-less, right?
What are the best ways to employ Repulsion Bomb? How should it be slotted ... and why?
Rather than looking for a Build ... I'm looking for a list of "do's and don'ts" for Ninja/FF. What are the "must have" powers and slotting choices for them ... along with the "avoid at all costs" powers that do not return on investment. And yes, I'm wanting to play one of these after Going Rogue goes Live, even with the 2m/4m refresh on the Grant Invis and Bubbles